Author Archives: TemplateToaster

3.4. Opening a Project


As mentioned above, you can use the saved project any time later to edit or modify the template or theme design. There are two ways to open the project for later use.

1. From Start-up Screen

You can choose the option from the startup screen as shown below. When you select the ‘Open’ option, a browse window will open up. You can find your project here and double-click to open the selected project with TemplateToaster. Moreover, if you want to open up any recent project then simply click on the arrow to show the list of recently opened projects. Then choose the desired project to open it up. 

2. From File Menu

You can also choose the desired project from the File menu. And can open the desired theme/template.

3.3. Saving a Project

Once you have created the project, and it has been activated, TemplateToaster allows you to save the project for further use as well. So you can modify or edit the project later on. Here are the ways you can follow to save the project:

Save Button

  • Once you are done with the designing of the theme or template you can save the project simply by clicking on the ‘save button’ on the top of the menu screen. 

Save

You can also save the theme/template design simply by clicking on the ‘save’ option in the File menu.

Save As

You can select the ‘Save As’ option from the File menu itself if you want to change the location where the project will be saved. Or to create a new copy of it.

Close Button

Once you have saved the theme/template design simply click on the close button. Now you can use the same theme/template design in the future and modify it. To know more do check the Opening Project section.

3.2. Preview & Export Theme/Template


TemplateToaster also provides a preview and export theme/template option. This is again a good option in a website builder as you can preview the design as it is. See the changes, modify the details, and see how it looks on the browser before exporting the theme or template design. Once you are good to go with the template/theme design you can export the final results. 

Here are the two ways to preview and export the theme/template design:

1) Quick Access Toolbar: Choose the preview option from Quick Access Toolbar where you can also choose the desired browser option.

2) File Menu : Select File Menu –> Preview .

– Export a Theme/Template: Now you can easily export your theme/template design in WordPress, simply by clicking on the button and in the same position. You will then find the export option for the CMS you are currently working on.

2. After clicking the Export button you will get a screen as shown below:

1 Folder / Zip

Next, you will find the option to export the theme/template in the form of a folder or zip file. So you can choose accordingly, whether you want the file zipped or in folder form.

2 Right to left language support

  • So if you want the theme to support the right to the left language then you simply need to check the checkbox of the ‘right to left language support option. 

3 Folder Name / Path

After this, you need to choose the folder name and pathway.

4 Content

This check box facilitates you to export the template with/without content. In case you check it, the template will be exported with content.

5 Click Export

Then click on the ‘Export’ option to export the theme safely.

3. The TemplateToaster software allows you to export your theme/template designs for different CMSs. You will find ten different Content Management System options to choose from. Make sure to select the desired CMS platform to export the template/theme design for the desired CMS similarly as mentioned above for WordPress.

Lastly, if you have any questions or need help in any step connect to us anytime through Support.

3.1.4. Choose Color Scheme & Typography Options

This screen option will appear on the main window as default. So you can select the colour scheme and typography for your project in advance. And in case you want to change the colour scheme and typography later, you can also do it.

Simply, select the General Tab > Scheme.

TemplateToaster allows you to modify the colour scheme or text style anytime while designing using the software. Let’s talk more about this here:

COLOR SCHEME

Now you can give your design a beautiful look with more than hundreds of pre-installed colour schemes based on Bootstrap. You can easily scroll down to see the list of colours and choose the suitable ones for your design. 

TYPOGRAPHY

You can find many typography options to design the text and font style of your website. The typography options include Font Size, Font Family, and line of height. You can specify the font size and line height in the given boxes. Else you can also choose the default values.

ADD COLOR SCHEME

If you want to customise your colour scheme then you can do so. Simply click on the (+) option, which you can find under the colour scheme list. When you click on the (+) option ‘More Schemes’ dialogue box will open up. Here you can choose between Primary, Secondary, Success, Infor, Danger, and Warning colours, and give specific names to them. For more details on this check out the ‘More Schemes’ section.

ADD FONT

You can also add desired font style for your custom theme designs. For this simply click on the (+) option under the typography list. A new dialogue option will open up. In this custom fonts dialogue box, you can find a huge collection of fonts which can also browse from Google Web Fonts, Custom Fonts, and System Fonts. Thus you can simply add any font to the typography list as you need to custom design themes. For more details, check out the custom font dialogue section.

Font Size

In this option, you can customize the font size. Thus you can customize the required font size for the selected typography. You can also go with the default font size which is 14.

Line Height

The line height is a CSS property that sets the height of the line box. Mostly it is used to set the distance between lines of text. Thus you can use this option to specify the line height where the default value of the height is 1.42. You can customize it as needed. 

3.1.3. Main Interface of Software

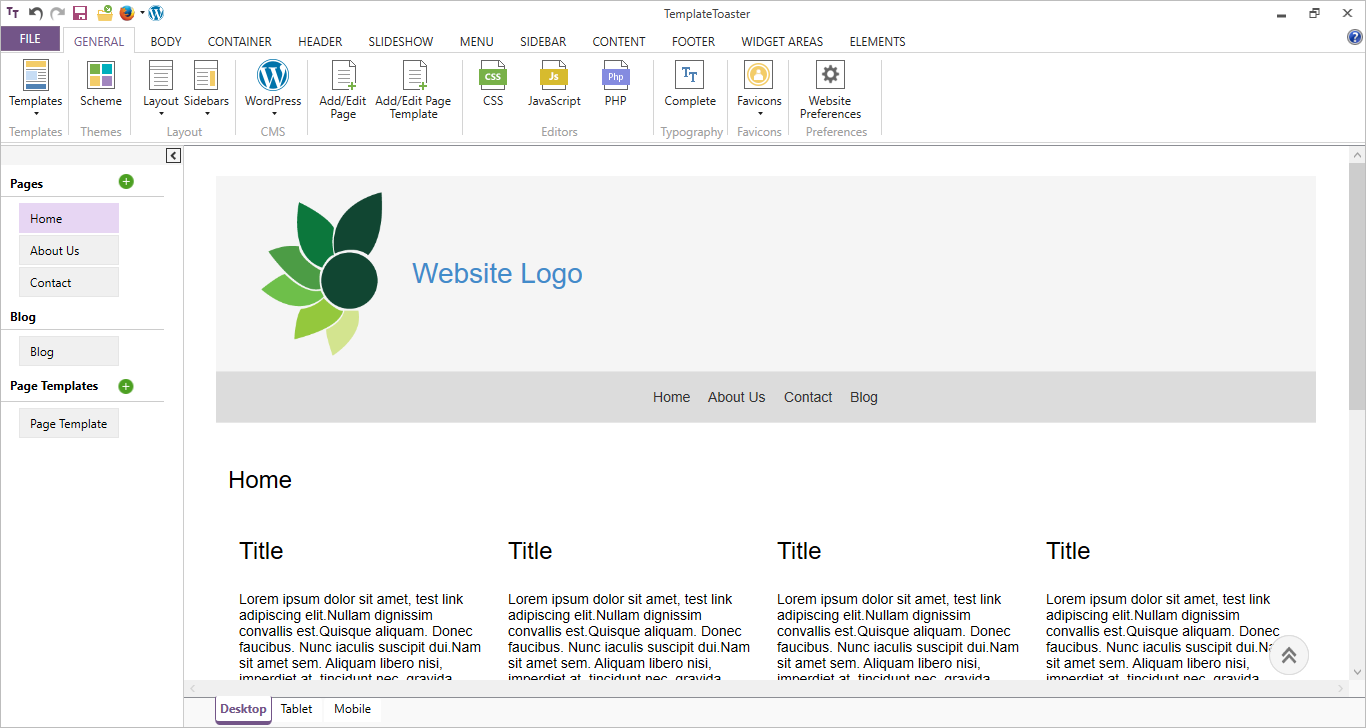
Now let’s talk about the main interface of the software. This is where you can start designing and customising the design of the theme/template using TemplateToaster software. Here are the options that you can customize through the main interface of the web builder.
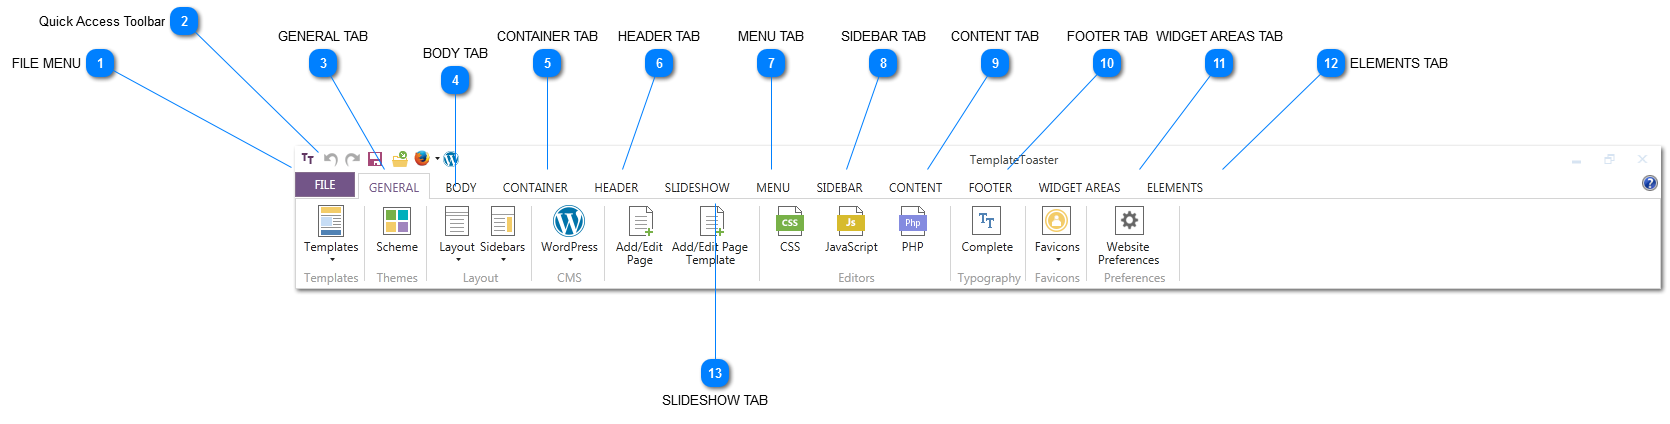
FILE MENU

The file menu consists of a list of various commands to perform different functions like creating a new project, saving the project, opening the project, exporting the project and many others. And for more details go through the File Menu Section.

Quick Access Toolbar

The quick access toolbar provides you with a list of frequent actions performed by the user. Thus these actions include Undo, Redo, Save, Preview, Open File, and Export. Also for more details and an explanation of the accessibility toolbar options do visit the Quick Access Toolbar Section.

GENERAL TAB

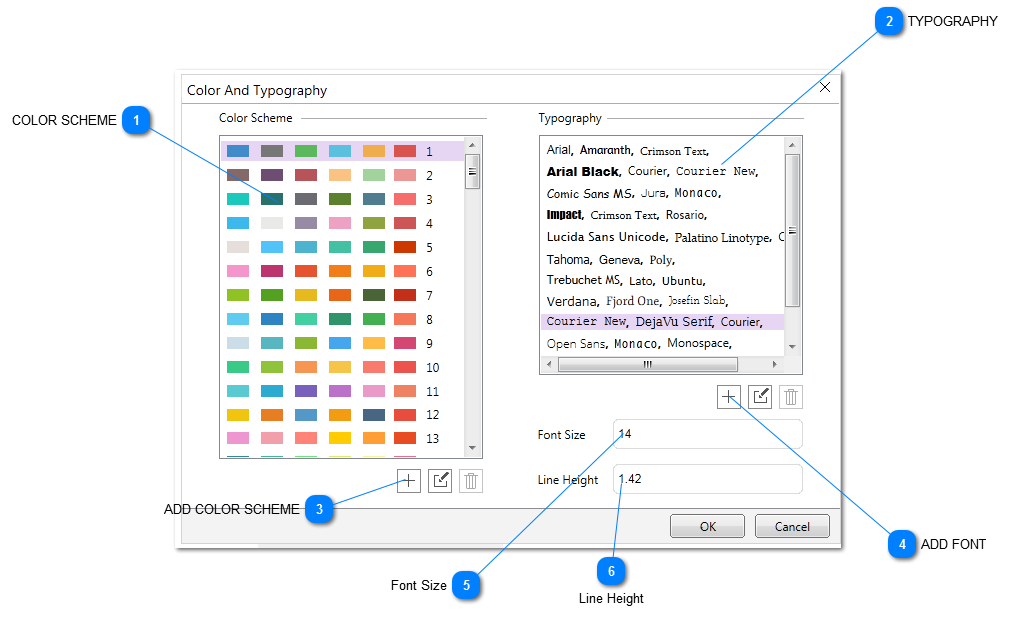
Under the ‘General Tab’ options custom design the template/theme for the website. Also these options include sample predesigned templates, colour scheme options, typography layout, CMS selection option, add/edit template designs, CSS and JavaScript editors, and favicons. So, find out more details in the General Tab section. BODY TAB

The ‘Body Tab’ consists of options to design the body of the theme/template for the website. Also, you can choose the background, texture, and effect, the type of background like fixed/scroll. And you can also customize the scroll-up button for the template body from the Body Tab section.

CONTAINER TAB

In this tab, you will find different options to modify the background, layout, and effects of the page. So for more details check out the Header Tab section.

HEADER TAB

This tab includes options for designing the header which includes header position, background, layout, effects, foreground images, text areas, title, and slogan. Also it contains settings for configuring the logo and social media icons. For details, please refer Header Tab section.

MENU TAB

Under the ‘Menu’ tab you can find various options to design the menu of the page. Again you can find menu options like preset styles, menu position, background, layout, effects, logo, foreground image, text areas, menu button designs, sub-menu design options, and edit menus. And for more details on these options do check out the Menu Tab section. 

SIDEBAR TAB

The sidebar tab provides you with various options to design the sidebars. Also this includes the sidebar position, background, layout, effects, and height. So for more details refer to the Sidebar Menu section.

CONTENT TAB

As the name suggests it includes all the options to design and customize the content part of the template/theme for the website. Again you can find some preset styles for the content with many options to set the content properties, background, typography, texture, effects, shadows, lists, and tables. Furthermore, you can find the same options while designing posts, and the comment form. In addition, you can also export a theme or template with no dummy content, and straightaway adds the fresh content on the WordPress dashboard. Furthermore to know more refer to the Content Tab section.

FOOTER TAB

The footer tab provides options to design the footer of the template, theme, or website. Then you can find preset footer styles, options for layouts, and background designs, select texture, effects, and shadow, browse custom images to add to the footer, draw text area, and choose footer typography, and social media configuration settings. So to know more check out the Footer Tab section.  

WIDGET AREAS TAB

This tab option activates if you choose CMA platform options like WooCommerce, Magento, Joomla, and OpenCart. Again if you select Jooma the Module Position tab will appear instead of the Widget tab. In case you select Magento or OpenCart, the Block Reference tab will appear. Overall the Widget Area option provides you with the option to design the module/widgets/block, like the container properties, container background, header properties, header background, texture, effects, shadow, border, height, typography, content properties, and content background. To understand more details go to Widget Areas Tab.

ELEMENTS TAB

Under the Elements tab section, you will find the options to design the Bootstrap based components like Buttons, Input Fields, Pagination, Breadcrumb, Block Quote, Labels, Alert, Badges, Line, CheckBox, and Radio Button. So for more details on these options check out the Element Tab Section.

SLIDESHOW TAB

The Slideshow tab consists of all the options you need to create slideshow position, transition effects, button, pagination, background, layout settings, effects (texture, shadow, etc.), foreground images, text area, and logo browsing. You can also remove the slideshow from the theme/template/website. So simply untick the checkbox. Find more details in the Slideshow Tab section.

3.1.2. Start from Scratch or Choose from Sample Templates

TEMPLATE CATEGORY

From the ‘Template Category,’ you can choose from a list of various categories for template designs. You can choose one category from business, education, and more. Based upon your selection the ‘Template Gallery’ will show the sample template category based upon your selection.

SAMPLE TEMPLATE GALLERY

Then you need to choose the sample template on which you want to work or create a design. Click on the template to modify and customize its design as needed and based on your preferences.
START FROM SCRATCH

Lastly, click on ‘Modify’ and ‘Start from Scratch’ on the screen to start and customize the theme or template design from scratch. 


3.1.1. Select Desired CMS

You can choose the desired CMS. TemplateToaster offers customizable template/theme designs for different CMSs like WordPress, Drupal, Prestashop, WooCommerce, Joomla, and many others to choose from. Make sure to choose the CMS you want to work on from the start-up screen. And go ahead and design a template/theme for your website.

WordPress

Needless to mention, WordPress is one of the top choices and the best CMS platform. So it is the most widely used CMS and nearly 43% of the websites on the web are run on WordPress. Initially, WordPress was only used for blogging, but now it is popularly used for creating websites, portfolios, membership websites, online stores, and more.

Highlights:
  • WordPress offers your freedom and straightforwardness to build different kinds of websites. 
  • Do not need any technical skills or coding knowledge.
  • SEO-friendly features.
  • Supportive Community.
  • Ideal for beginners and developers.

Drupal

Drupal is also a popular open-source CMS platform. And it is a PHP-based Content Management System on which many popular websites run. So it is a good option for those who want to hire developers to build complex or large websites. Moreover, Drupal is also a good option if you are planning to build websites that require high customization and manage a lot of data. Such as social networking, eCommerce sites, government sites, file storage websites etc.

Main Highlights:
  • Easy to add content and many custom content types,
  • Easily add your site with modules.
  • Community support.
  • Easy user management.

WooCommerce

WooCommerce is one of the top platforms for running eCommerce sites. Again it is pretty straightforward to use. An adaptable e-commerce platform which takes care of logistical and technical requirements. Simply by providing hundreds of free and paid WooCommerce extensions.

Main Highlights:
  • Seamless integration with WordPress.
  • You can sell online products through WooCommerce.
  • Easily manage inventory.
  • Secure and up-to-date coding standards.
  • Many payment options like PayPal, Stripe, etc.

Prestashop

Prestashop is also an open-source eCommerce CMS platform. Moreover it is based on the PHP language and supports the MySQL database management system.

Main Highlights:
  • Easy to customize Prestashop themes.
  • Add-ons to enhance the built-in functionality.
  • Easily add new features with Prestashop modules.
  • Supports many payment gateways.

Joomla

Joomla is again one of the popular open-source CMS platforms available for free. But you will require hosting and a domain name. Again it comes with many built-in features and one-click installation. But then again it is a great option for web developers and professionals, and certainly not the best for beginners. Also Joomla is mostly used for websites like complex blogs, government websites, business and eCommerce sites, news sites, etc.

Main Highlights:
  • A lot of flexibility and numerous options. 
  • Easy to edit content.
  • Huge community support.
  • Can use Joomla to run online stores.

Blogger

Blogger is a popular blog publishing platform offered by Google. While the platform allows you to post and publish blogs for free. Again blog is usually published under the sub-domain blogspot.com. But it also provides the option to choose your custom domain.

Main Highlights:
  • Easy to get started, write, and publish blogs. 
  • In-Built support from Google Adsense.
  • Publish multiple blogs from one account.
  • Seamless integration with Google+.

HTML

Hyper Text Markup Language (HTML) is the standard markup language used to create web pages. Also this allows you to create static websites instantly. While TemplateToaster provides customizable templates and themes to design web pages for HTML.

Main Highlights:
  • Google and Custom fonts with dynamic font styles.
  • Add YouTube videos to the website.
  • Follows HTML5 and CSS3.
  • W3C validation ensures compliance with web standards.

Magento

Magento is a powerful open-source eCommerce for big organizations and companies. Moreover, it is written in PHP. It uses the MySQL/MariaDB relational database management system. 

Main Highlights:
  • Highly customizable with lots of add-on features.
  • Easily handle and manage huge websites.
  • Supports many payment gateways.

OpenCart

OpenCart is also an effective customizable platform to build eCommerce stores. Moreover, OpenCart takes pride in transparency, open code, community vision and no catches.

Main Highlights:
  •  Multi-store management with custom settings for each.
  • Multi-currency and Multi-lingual.
  • Hundreds of world-renowned shipping methods.
  •  Recurring Payments option to keep control.

VirtueMart

The best fit for low to medium-level traffic websites, VirtueMart supports an unlimited number of products and categories. Also it is based on the Joomla MVC framework having features.

Main Highlights:
  • Supports multiple prices for a single product.
  • Inventory Management with virtual stock option.
  • Multi-currency format with auto-update.
  • 8 checkout options with shipment tracking.

Open

Once you choose the desired CMS you want to work on to create web designs make sure to select the ‘Open’ option. Click on open to locate the project you want to work on. So click on open to navigate to the browser window. Once you find the project ‘Double Click’ on the project, it will open up in the TemplateToaster software. In case you want to open the last or any recent project then click on the arrow to get a list of recently opened projects. Then choose the desired project to directly move on it.


3.1. Creating a New Project

If you are planning to create a new project with TemplateToaster, then do not worry as it is very easy and quick to start with. Even if you are a beginner and have no knowledge of how to code a website and have zero coding skills. You can still create a web design with this web builder. There are two ways to start creating a new project. To Create a New Project in TemplateToaster, you can follow the steps mentioned below:

Select Desired CMSChoose the CMS you want to work with. This is how you will start to create a new theme/template.

Start theme/template From Scratch or Select Sample TemplatesYou can custom design your new theme from the scratch and create beautiful designs just the way you want your web design to look from the start to the end. Else, you can also select the ‘Go With Sample Templates’ option. Each sample template is strategically designed based on different kinds of industries in the business. So you can choose the sample template that goes best with your theme and design ideas. 

Choose Color Scheme & Typography optionsSelect the colour scheme that matches your idea and perception of the new design theme. You can also select the typography you want for your new project design.

Main Interface of the SoftwareUnder this section, you will find the main interface of TemplateToaster software, after the installation and activation of the software is complete. 

3. Creating Project

Under this section, we will be discussing some quick tutorials to help you start with TemplateToaster, and start creating your project. Discover answers to your question. And find out how this web builder gives you the freedom to create, design, and manage web designs exactly the way you want. Yes, it’s free and you can upgrade at any given time.

Now, get a quick start on your journey with hundreds of premade template designs, and customizable web themes. Truly and strategically built for different types of industries. Create a website that can help you grow your business.

So, here is a quick tutorial to understand how to create projects on TemplateToaster better. And get familiar with the software.

Creating Project:

Creating a New Project

Preview & Export Theme/Template

Saving a Project

Opening a Project