Category Archives: Upload your Theme/Template/Website

5.10.2. Template Options in VirtueMart by TemplateToaster

Even after the installation, customizing the templates by TemplateToaster is so easy. You will see an additional tool when you go into the specific template settings, under the name “Template Options”. These Template options give you flexibility to change some elements of your Template. Let us have a look at these Template options.

1 Header Options

This tab provides you the option for customizing the header settings.

2 Footer Options

This tab provides you the option for customizing the footer settings.

3 Color Options

This tab provides you the option for customizing the color settings.

4 Sidebar Options

This tab provides you the option for customizing the sidebar settings.

5 Style Options

This tab provides you the option for customizing the style settings.

6 Menu Style Options

The tab provides you the option for customizing the menu style settings.

7 Menu Assignment

Use this tab for customizing the menu assignment settings.

5.10.1 Upload a Template in VirtueMart

Follow these steps to upload your theme in VirtueMart:

STEP 1: Log in to the Control Panel.

STEP 2: From the top navigation bar of the panel, navigate to Extensions -> Manage > Install.

STEP 3: Click on the browse button and install the theme by clicking upload and install button.

STEP 4: After uploading the theme, you can set the theme as your default theme.

STEP 5: Now you may visit the site and can see how it looks on the browser.

5.10. Installing VirtueMart

For uploading your theme in VirtueMart, firstly you need to Install the VirtueMart on your Joomla platform. This can be done by using the VirtueMart plugin. So here are the steps to install a VirtueMart Plugin :

STEP 1: Log into your Joomla Control Panel and from the top menu navigate to the Extensions –>Manage –> Install.

STEP 2: As you select the Install option, a browse screen will open as shown below. From here, you can locate your Virtuemart zip file.

STEP 3: The com_virtuemart.3.0.14 zip file contains 3 zip files as shown below. You have to follow the correct sequence to install all these 3 files one by one once extracted. The sequence will be:
1. com_virtuemart.3.0.14.zip
2. com_virtuemart.3.0.14_ext_aio.zip
3. com_tcpdf_1.0.0.zip

STEP 4: Once you installed all the three files; an installation success message will display on the screen as follows:

STEP 5: While Installing the Plugin, you can also install the sample data that will include useful product features.

STEP 6: Installation is finished and now, you can see the VirtueMart Tab in the top menu of the control panel of Joomla.

STEP 7:  Lastly, you are all set for Uploading the theme/template that you created with TemplateToaster.

5.9.1. Theme Options in PrestaShop by TemplateToaster

1 LOGO
The Logo tab is used to customize the header logo.

2 INVOICE AND EMAIL LOGOS

3 ICONS

Icons tab helps in customizing the icons as you want.

4 MOBILE

5 HEADER

The Header tab is used to customize the header.

6 COLORS

Use the Colors Tab to customize the colors as required.

7 META TAGS

Use the Meta Tags tab to help in customizing the meta tags.

5.9. Upload a Theme in Prestashop

Follow these steps to upload your theme in Prestashop:

STEP 1: Copy the ‘Theme’ Folder from the Exported folder and Paste it at Prestashop (Root) -> Themes -> Paste your Theme here. Then Log In to your dashboard.

STEP 2: Then from Backoffice Go to Preferences -> Themes -> Add New Theme -> Create New Theme.

a) Preference -> Themes

b) Preference -> Themes -> Add New Theme

c) Preference -> Themes -> Add New Theme -> Create New Theme

STEP 3: Fill the required Fields, Theme and Directory Name should be the same as the name of the exported theme. Make sure to select the preview image from the exported theme. Select the Default Left, Right Sidebars, if you want them in the Theme.

STEP 4: To upload Module from Prestashop Backend Go to Modules -> Modules and Services -> Add New Module -> Upload the module zip file placed in the modules folder.

a) Modules -> Modules and Services

b) Modules -> Modules and Services -> Add New Module

c) Modules -> Modules and Services -> Add New Module -> Upload the module zip file placed in modules folder.

STEP 5: Copy and merge the Override folder given at root folder.

STEP 6: Move all of the JavaScripts to End. To do this Go to Prestashop Backoffice -> Advanced Parameters -> Performance -> CCC (Combine, Compress and Cache) -> Move JavaScript to the end -> Yes.

5.8. Upload a Theme in OpenCart

Follow these steps to upload your theme/template in the OpenCart:

1: Export your theme as a zip file with a File name at any desired location.

2: Then log in to your administrator dashboard.

3: From the left sidebar of the dashboard, navigate to Extensions –> Extension Installer. Now, click on the Upload.

4: Browse your theme and press the “Continue” option after selecting the theme. A success confirmation message will be displayed after the successful installation of the theme.

5: From the Left Sidebar Menu, Navigate to Extensions–> Extensions–> Extension Type. Here you can Choose the extension type, select Themes(1).

6: When you select the Themes(1), a Themes Bar will display on the screen as shown below. Go to your ‘Store’ and click on the ‘Edit’ Button in the extreme right of it.

7: Now a Default Store Theme screen will open as shown below. Here in ‘Theme Directory’, browse your Theme and Status is by default Enabled. Save your settings by clicking on the Save Button from the Top Right corner of the screen.

8: Now in the Extensions navigate to Extensions –> Modifications. After refreshing your screen, you can see your TemplateToaster Theme here.

9: Now it is all done and you may visit the site to see how it looks on browser just by clicking home.

5.7. Upload a Theme in Magento

Follow these steps to upload your theme in Magento 1.9 :

1: Copy the exported skin and app folder to the Magento root directory.

2 : Login to the backend of Magento and go to the System -> Design.

3 : Next in the Design select the Add Design Change from the extreme right of the screen.

4 : Then in the Add Design Change option, select the Custom Design dropdown and choose your theme.

(Note: providing values to Date From and Date To is not mandatory. These two options can be utilized to provide a time period for which the Custom Design that you selected will remain active and visible on your website.)

5 : Select the Save button after filling in the required fields and you are ready to use the theme.

5.6.1.2. Theme Options in WooCommerce by TemplateToaster

Even after the installation, customising TemplateToaster’s theme is very easy. You will see an additional tool on the sidebar of your admin dashboard, under the name “Theme Options”. These theme options give you the flexibility to change some elements of your theme. Let us have a look at these theme options for better understanding.
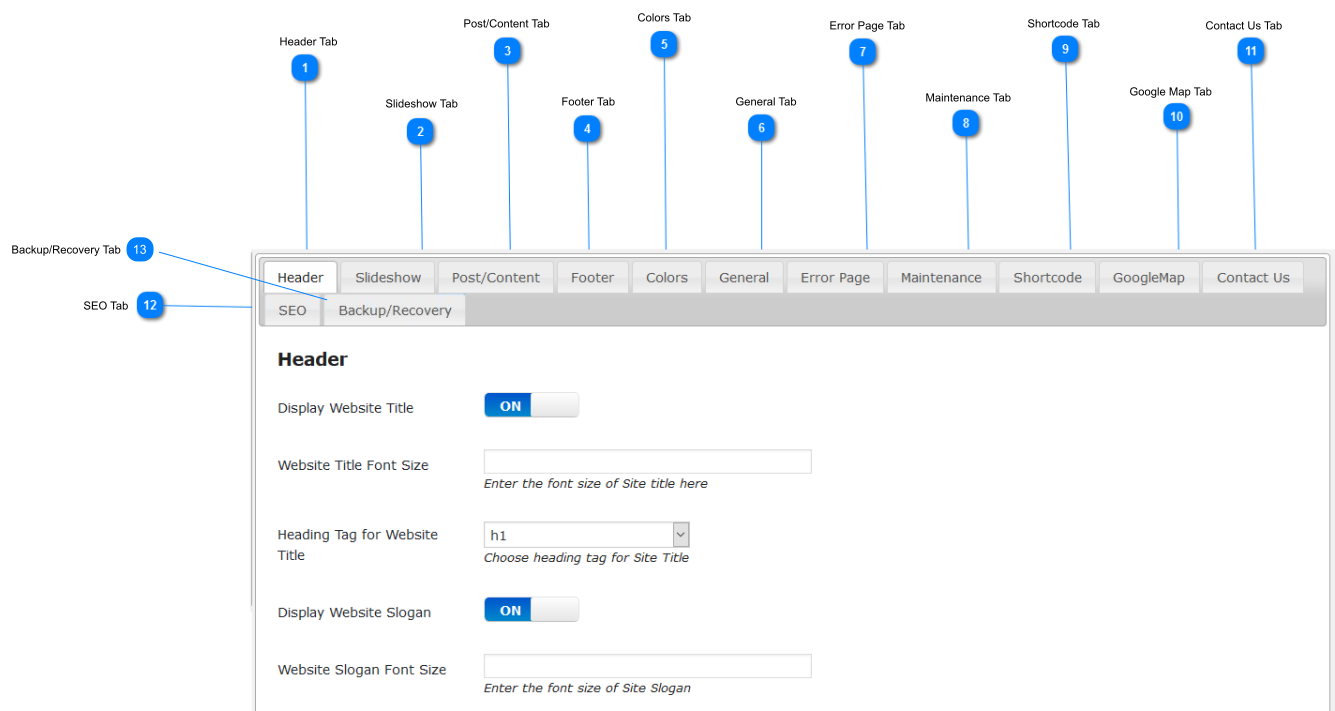
1 Slideshow Tab

This tab shows you the options of Slideshow for your theme. Even after installing, it allows you to replace the images used in the slideshow by uploading new ones.

2 Post/ Content Tab

This tab contains the options for customizing the post settings.

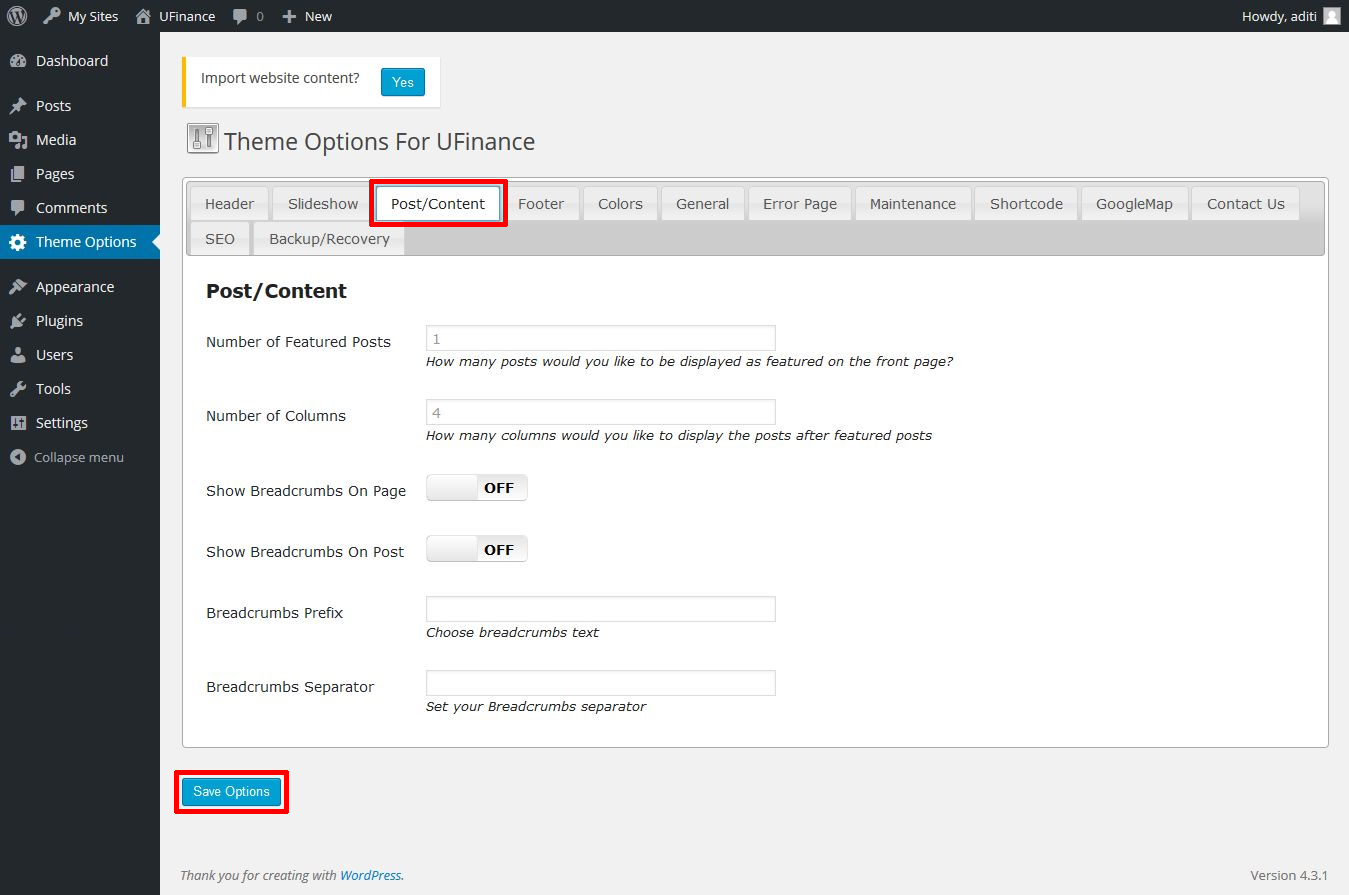
Number of Featured Posts –
You can specify the number of featured posts to display on the home page of the site.

Number of Columns –
You can also specify in how many columns to show the featured posts.

Show Breadcrumb on Page –
Breadcrumbs is basically the type of text-based website navigation that breaks the site into links of categories and sub-categories allowing major categories of information to be linked in a sequential order. Breadcrumb navigation is displayed to the user, so that they can easily navigate between the pages.
Select the ‘On’ option, if you wish to display the Breadcrumbs on the site. Otherwise keep it ‘Off’ to hide the Breadcrumbs.

Show Breadcrumb on Post –
You can show/hide the breadcrumb on the post.

Breadcrumb Prefix –
Use this option to set a breadcrumb prefix.

Breadcrumb Separator –
You can set a desired separator on the breadcrumb using this option.

3 Footer Tab

This includes following options to customize the Footer:

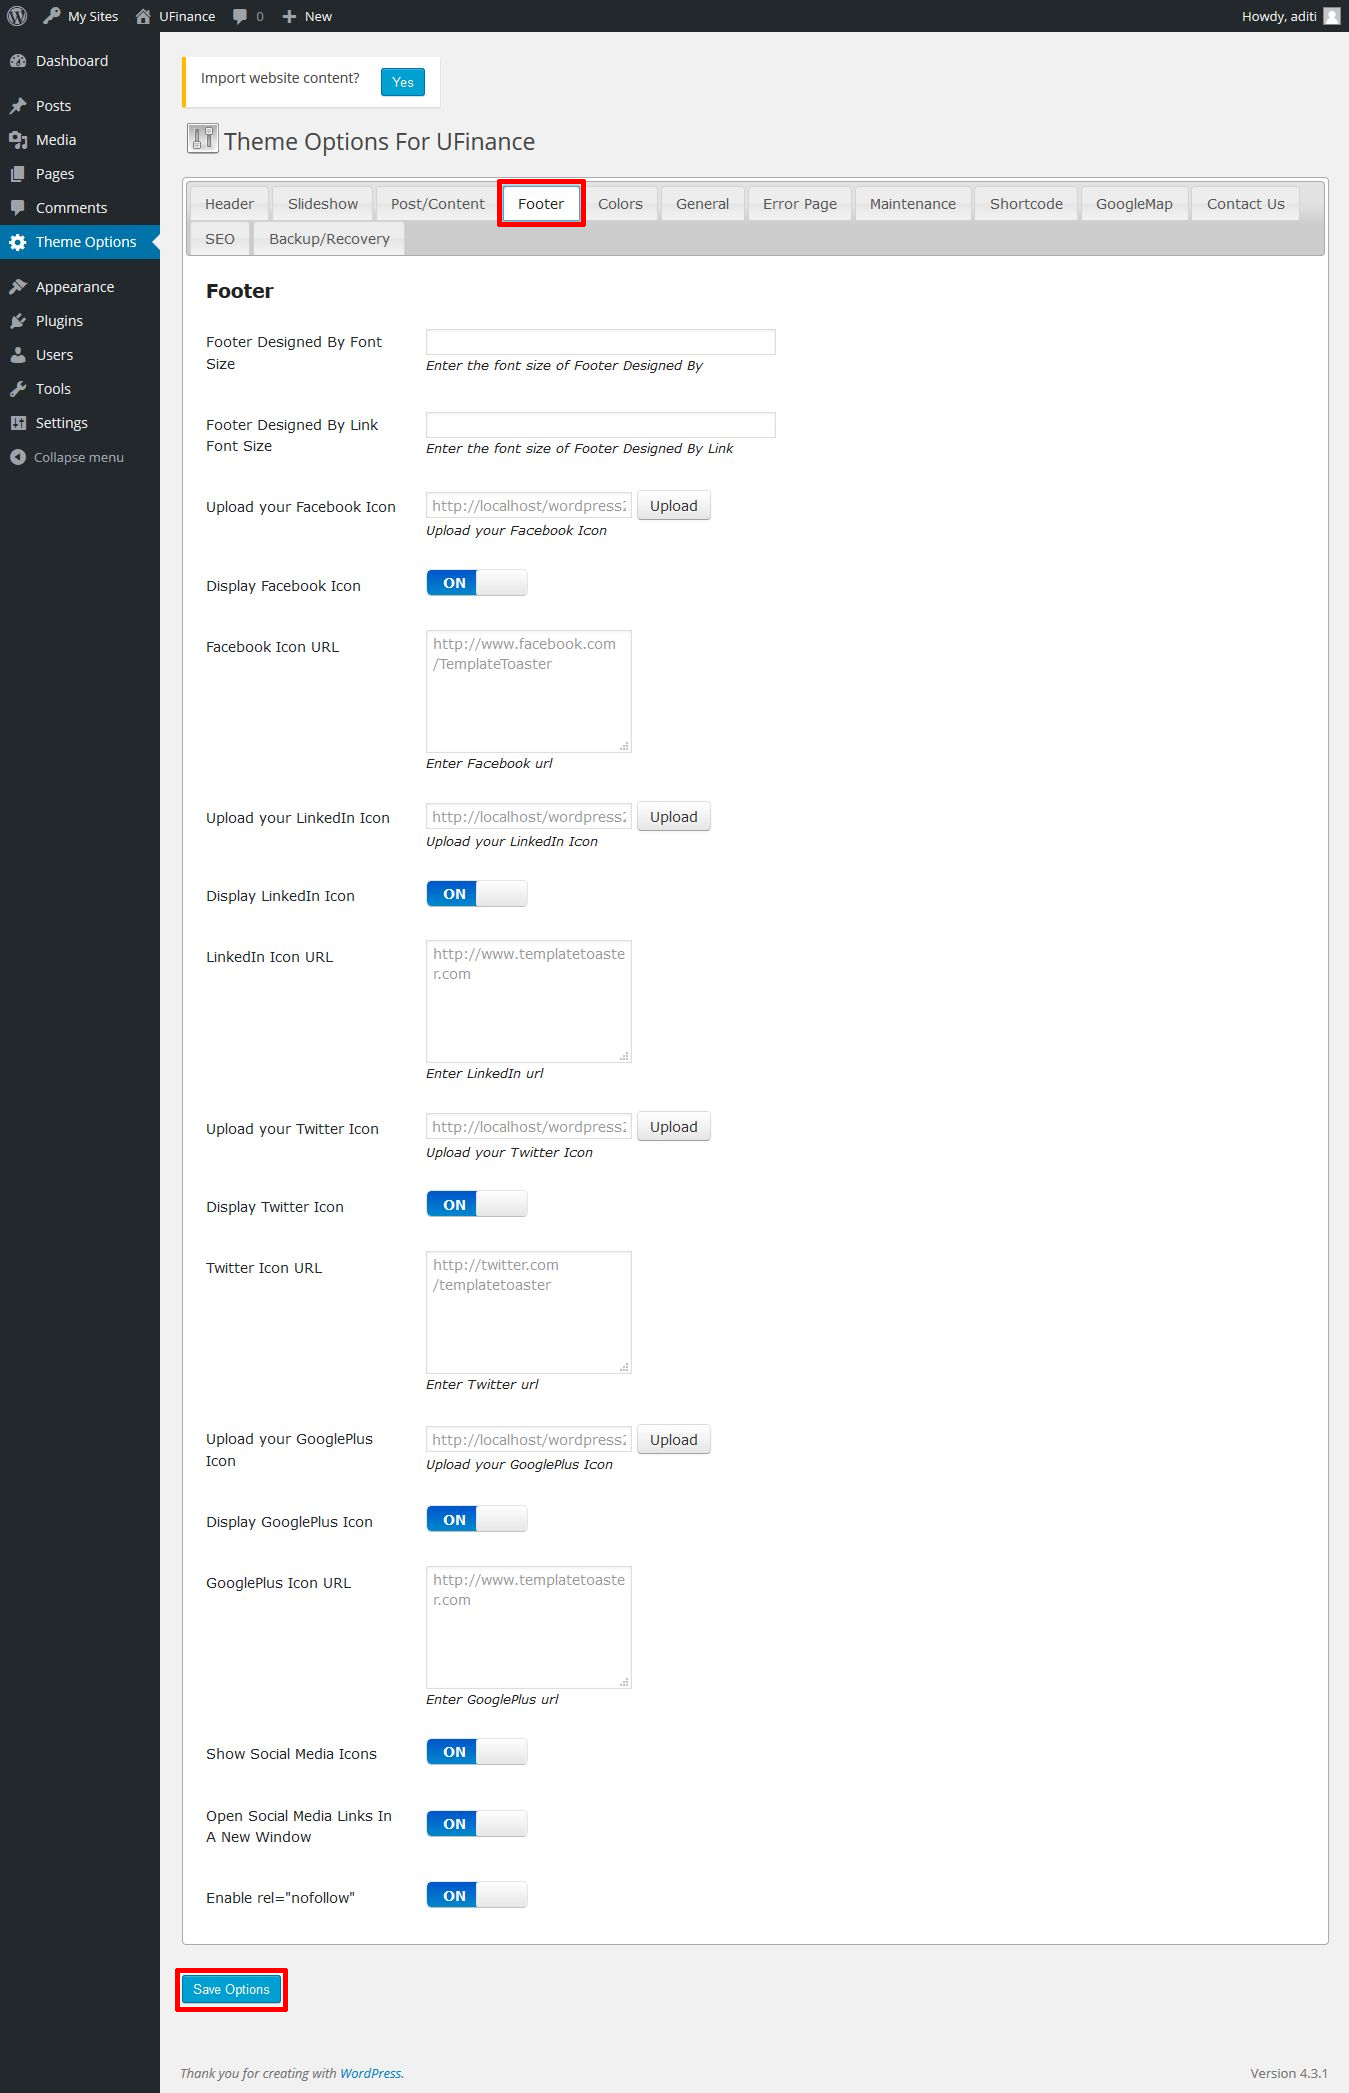
Footer Copyright Text –
Use this to add/edit Copyright Text in the footer.

Footer Copyright URL –
Place the relevant copyright URL on the Copyright Text in footer.

Display Footer Copyright –
Select ‘On’ to display the Copyright Text in the footer. Otherwise keep it ‘Off’ to hide the footer.

Footer Copyright Font Size –
Enter the required font size for Footer Copyright Text.

Footer Designed by Font Size –
Enter the required font size for Designed by element in the footer.

Footer Designed by Link Font Size –
Enter the required font size for Designed by Link Text.

Facebook Account Configuration-
You can upload a custom Facebook Icon and link it with your Facebook account. If you do not want to display Facebook Icon in the footer, you can turn it ‘Off’ and vice -versa.

LinkedIn Account Configuration-
You can upload your desired custom LinkedIn icon on footer. Then, specify the URL of the LinkedIn account to link with the icon. If you don’t want to display the Icon in the footer, you can turn it ‘OFF’ and vice -versa.

Twitter Account Configuration-
You can upload a custom Twitter Icon and link it with your Twitter account. If you don’t want to display Twitter Icon in the footer, you can turn it ‘OFF; and otherwise.

Google + Account Configuration –
You can upload a custom Google+ Icon and link it with your Google+ account. If you don’t want to display Google+ Icon in the footer, you can turn it OFF and vice -versa.

4 Colors

You can change the colors of some elements of the website, which are shown below:
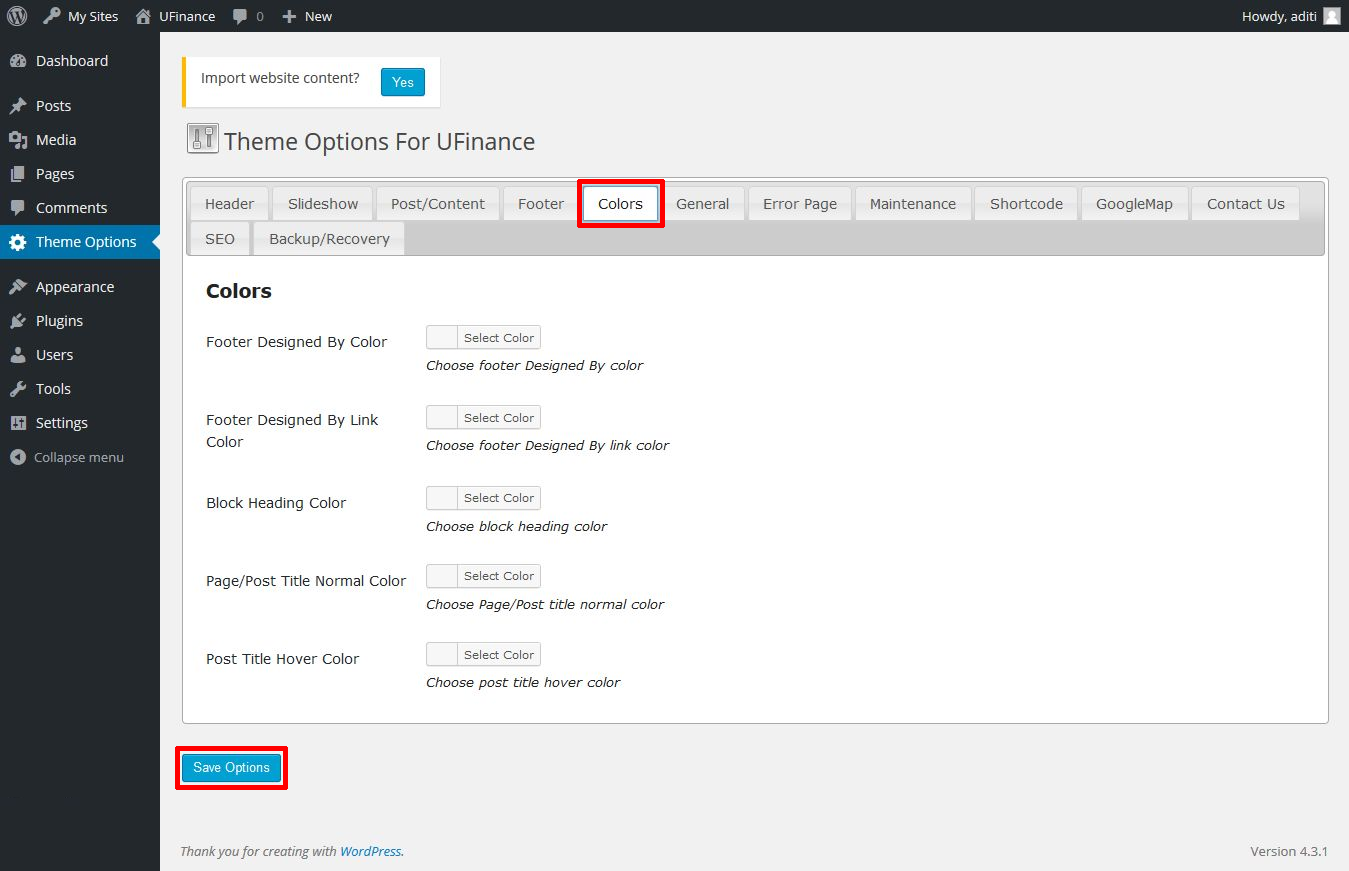
5 General Tab

This tab offers you the options of general elements of your website. Use this tab, if you want to enable/disable elements like, Google Analytics, Page Title, Post Title, Navigation, Next/Previous link, Comment display, Avatar, Back To Top Button etc.

6 Error Page Tab

This tab gives you the options for configuring error page settings like, redirect to home page if Error page occurs, displaying error message, image, and more.

7 Maintenance Tab

You can make use of this tab if your website is going on a maintenance mode. You can write the title and content for the maintenance mode page. And apply an image in the background, using the available options.

8 Shortcode Tab

In this tab, you can find several of the most commonly used shortcodes. From this tab, you can get the shortcodes for Google Docs Viewer, Google Maps, Related Posts, Google AdSense, Google Chart, Tweet Me Button, YouTube, Private Content, PayPal, Login Form, Custom Menu, Archives, Contact Us Form, Calendar, Categories, Links, Meta, Pages, Recent Comments, Recent Posts, RSS, Search, Tag Cloud and Text.
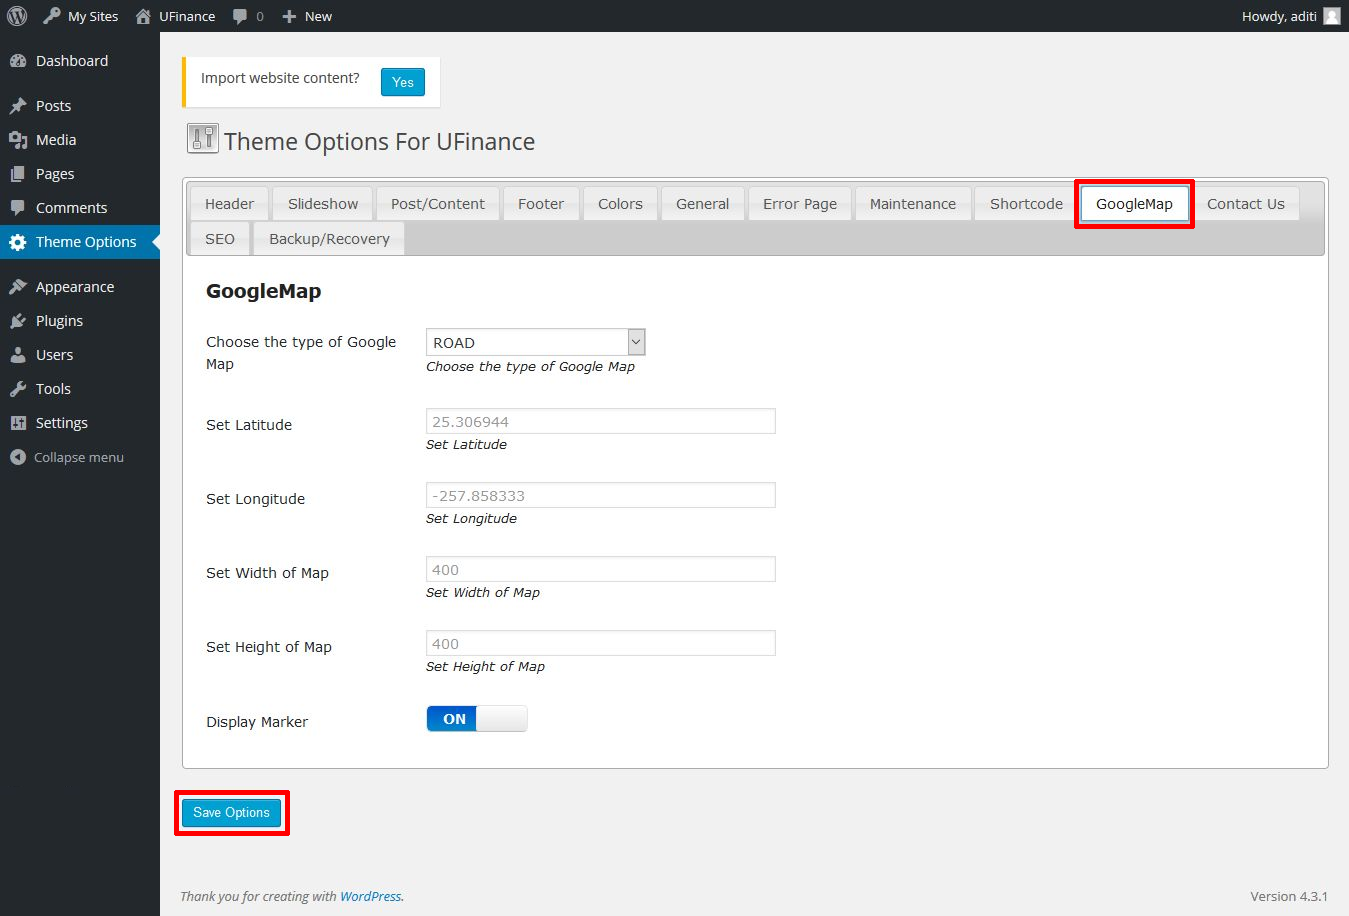
9 Google Maps

This tab has the options to facilitate you with a Google Maps on your website.
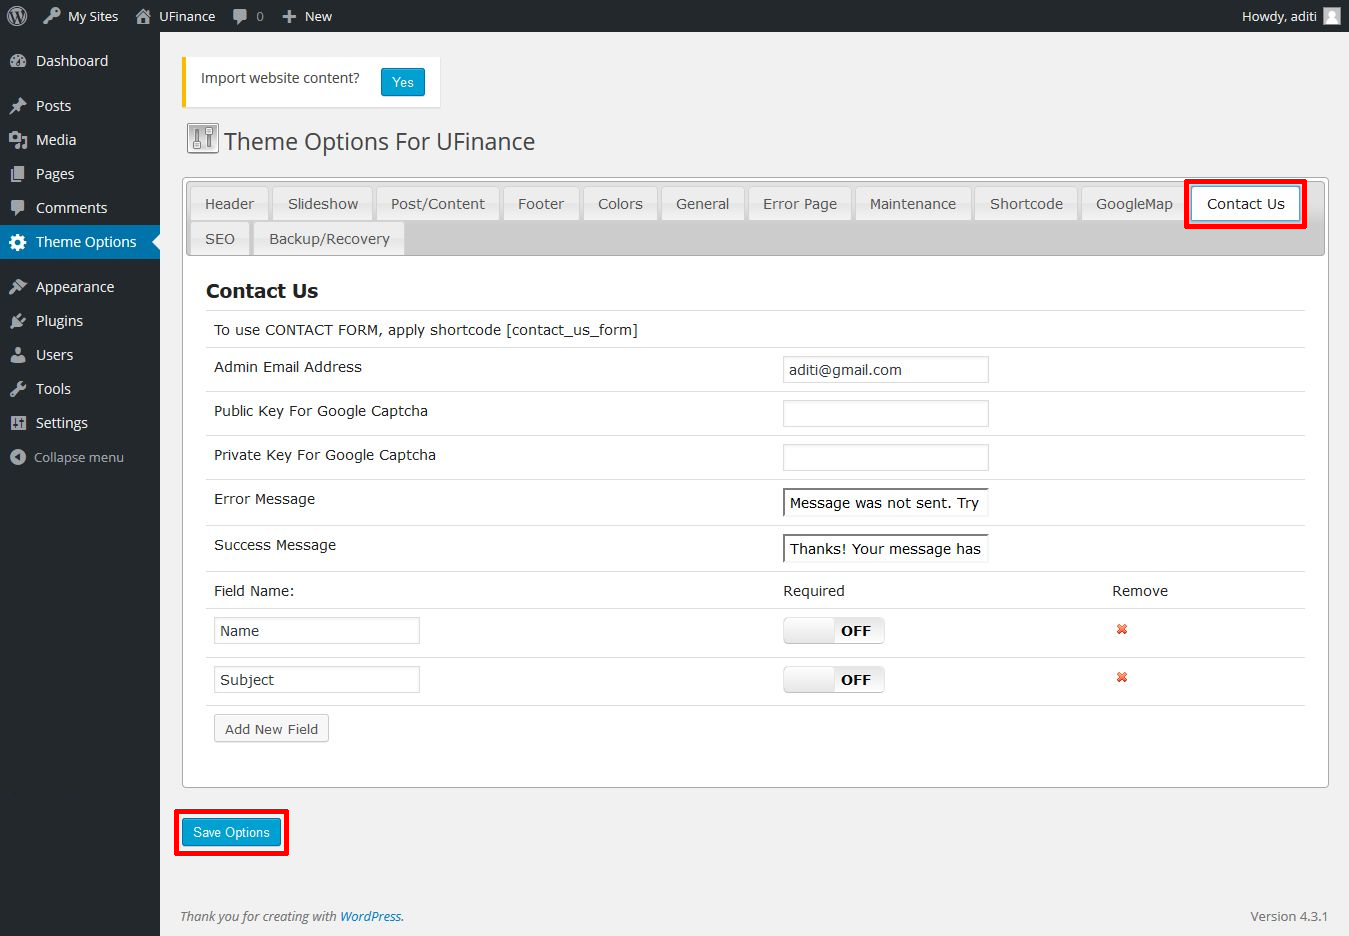
10 Contact us Tab

This tab lets you customize the contact form. You can specify a Public and Private key for Google Captcha. And can customize Error/ Success message, also add more fields in the form.

11 SEO Tab

This tab has important SEO options for your website, which are divided in sub-tabs.
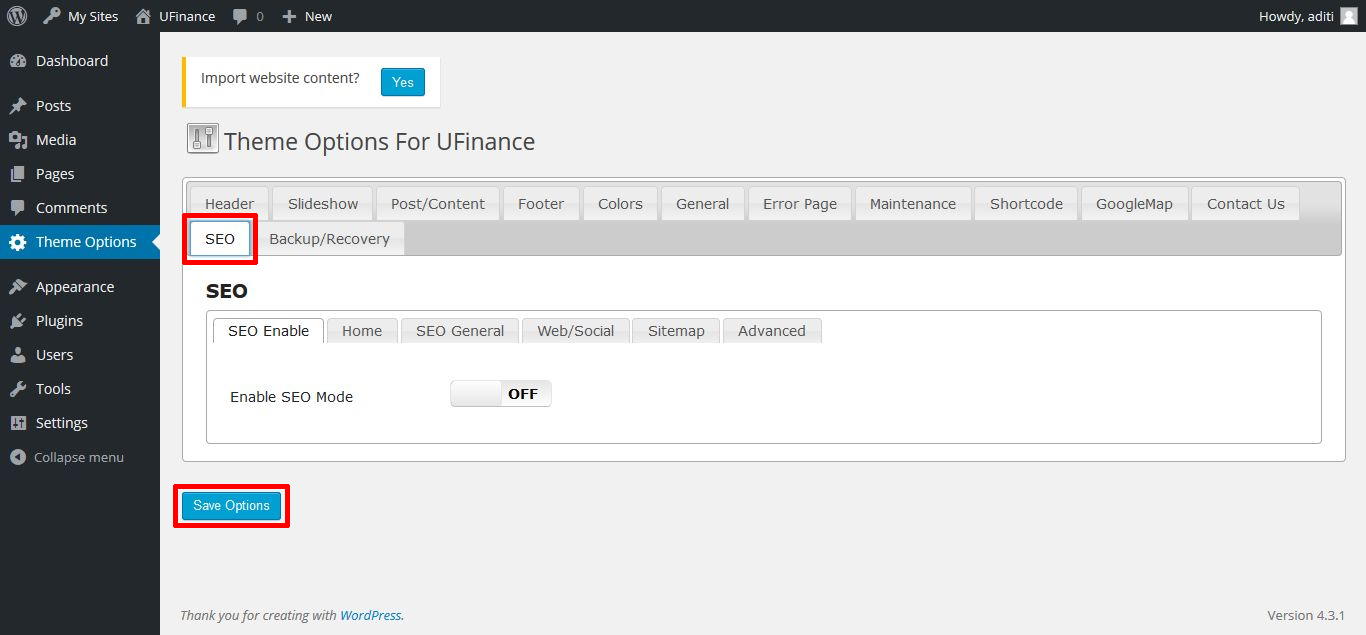
SEO Enable –
It is up to you whether you want to enable the SEO mode or not.

Home –
From the home sub-tab, you can specify the Title, Meta Description and keywords of the Homepage. Besides this, you can select the Title formats of Page, Post, Category, Date Archive, Author Archive, Tag, Search and 404.

SEO General –
This sub-tab has options to ON (enable)/ OFF ( disable) general SEO features, such as use of Meta Keywords, use of categories as keywords, use of tags as keywords, auto generate descriptions, set No-Index for all pages, set No-Index for all posts and set No-Follow for all pages.

Web/Social –
Through this sub-tab, you can verify your website with Google Webmaster Tool, Bing Webmaster Tool and Pinterest Webmaster Tool. And, you can also provide a default Google Plus profile, which is required for Google Analytics.

Sitemap –
You can see the sitemap of your website from this tab. Also, you can decide whether you want to include Page Type and Post type in the sitemap or not.

Advanced –
This sub-tab gives advanced SEO options. Those options allow you to turn ON/OFF the use of No-Index/ No-Follow for different archives, like Date Archive, Author Archive, Tag Archive, Category Archive, Search Archive. And, you can define additional Post and Page headers.

12 Backup/ Recovery Tab

Backup and Recovery is an important feature of TemplateToaster. You need to provide the FTP information and an Email address for backup storage. As a result this will create an automatic backup schedule. The backup of your website will be created automatically according to the schedule you’ve made. Also you can choose an automatic backup interval according to your preference, which could be as short as 10 minutes or as long as a week. Moreover, you can choose the files you want to include in the backup and which one to exclude. Similarly, while restoring the backup, you can also select which type of files you need to restore and the ones to avoid from restoring.

5.6.1. Upload a Theme in WooCommerce

Follow these steps to upload your theme in WooCommerce.

STEP 1: Log in to your administrator dashboard.

STEP 2: From the left sidebar of the dashboard, navigate to Appearance –> Themes. Now, click on the ‘Add New’ option.

STEP 3: As you click on the Add New button, you will see the next screen as shown below. Click on “Upload Theme” from here.

STEP 4: Browse your theme and click on “Install Now” button .

STEP 5: After successful installation, you can Activate the theme on your website.

STEP 6: After activating the theme, you may visit the site to see how it looks on the browser.


The Website Front Page after activation of the theme is:

5.6. Installing WooCommerce

It is very simple to Install a theme on your WooCommerce . But for uploading your theme in WooCommerce, firstly you need to Install the WooCommerce on your WordPress platform. This can be done by using the WooCommerce plugin. So here are the steps to install a WooCommerce Plugin :

STEP 1: Log in to your WordPress dashboard and from the left sidebar menu, select “Plugins” to Add New plugin.

STEP 2: Now this will open a new window of ‘Add Plugins’. Then, click on the Upload Plugin button.

STEP 3: As you click on the Upload Plugin, you will see the next screen to browse the WooCommerce3.7.0.zip plugin file. Just select the file and click on Open to start the installation.

STEP 4: Once your plugin is installed, it will display a Page Setup screen as shown below:

STEP 5: Then simply press Continue to customize other settings regarding Store locale setup, Shipping & tax, and Payments.

STEP 6: Once you place all the settings, you are ready to use WooCommmerce.

STEP 7: When you press Let’s go!, you will be taken to the Products page. Here you can add a new product if you want.

STEP 8: Finally, you can go for Uploading the theme/template of your WooCommerce compatible website.